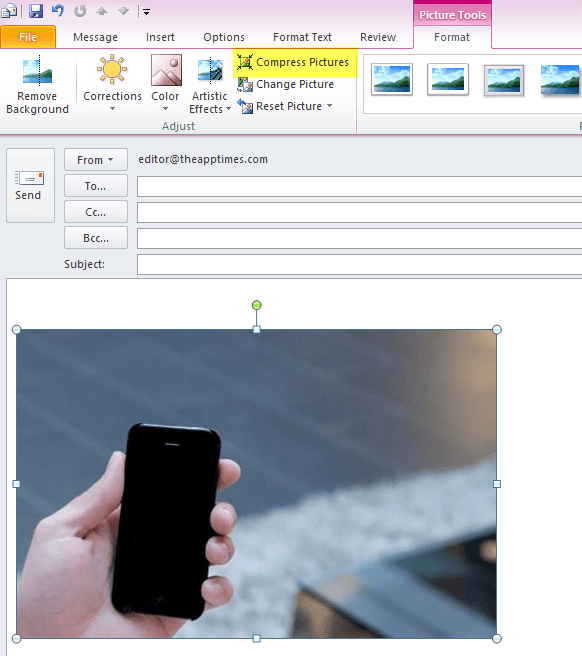
Compress images in powerpoint for windows. Open the powerpoint presentation that contains the images you’d like to compress and then select a photo. Once selected, you’ll automatically be in the “picture format” tab.
Here, click the “compress pictures” button in the “adjust” group. The “compress pictures” window will appear. How to compress images in powerpoint 1.
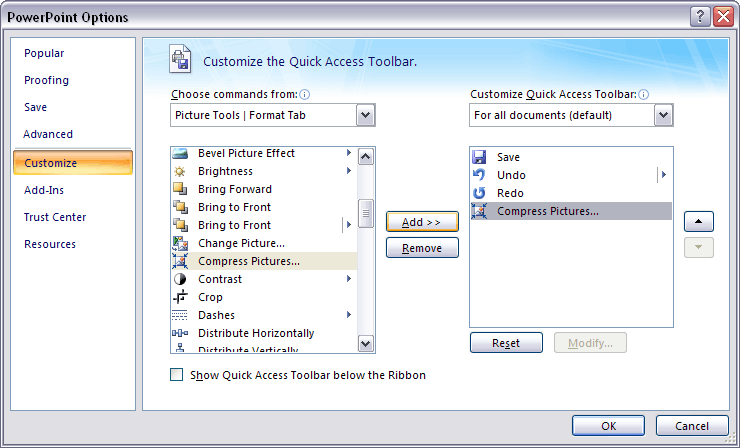
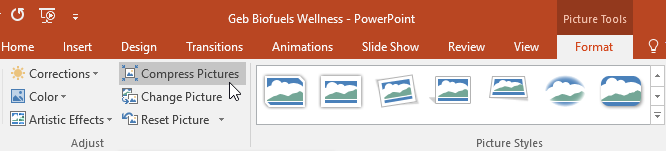
Open the compress pictures dialog box. Select your image in powerpoint to open the picture format tab, then click the. Choose your the compress options.
For your compression options, you have two choices (choose wisely). First, open a powerpoint presentation that includes pictures. Or, you could open an empty powerpoint file and insert your pictures (menu > pictures > this device).
After that, please select picture format. (if you don’t see this option, it’s probably because you didn’t click the inserted picture first. ) 3. Select the compress pictures command.
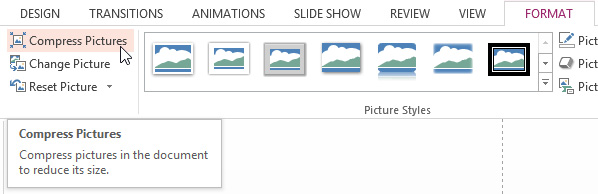
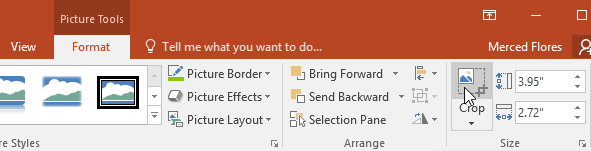
Inside the picture format tab, find and select the compress pictures command. Depending on your screen resolution and the size of your computer monitor, this command might appear as just an icon. Either way, the icon should be to the right of the transparency command.
Open the powerpoint discussion which contains the pictures you wish to compress and afterwards choose an image. As soon as selected, you’ll automatically be in the “picture format” tab. Right here, click the “compress pictures” switch in the “adjust” team.
The “compress pictures” window will certainly show up. Powerpoint 2013 includes a compress pictures command that can eliminate the extraneous detail in your images and thereby reduce the size of your presentation files. To save even more space, the compress pictures command also removes any parts of your pictures that have been cropped.
You can use this command to compress just a single picture or. Select the image or picture. Click the picture format ribbon at the top of the screen.
Select the checkbox to delete cropped areas of pictures option to reduce the size of the image or picture in the presentation. Minimize document size for sharing. Uncheck apply only to this picture if you want.
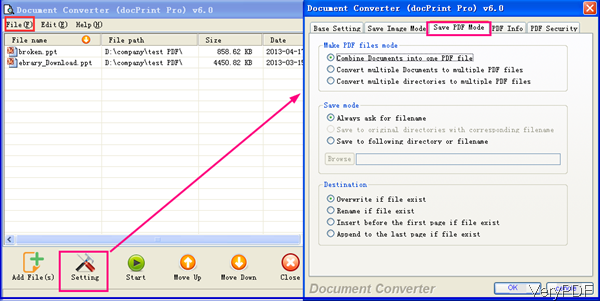
Click on the “ file ” option on the powerpoint ribbon. And then click “ save as ”. Click “ browse ”.
Powerpoint will open the file manager to let you save your presentation. Click on the “ tools ” option, and then click on the “ compress pictures ” option. The “compress pictures” window will emerge.
To compress your powerpoint document just follow these steps: Go to file > info. Choose the compress media option.
Just like with images, it will give you quality options, and pick the one that fits better your needs. Compression options “applying only to this image” is a phenomenal command because it allows you, if not selected, to apply compression to all the images in the presentation. This button is marked by default to avoid unintentionally compressing all the images, but, in my opinion, it is sensational to deselect and compress all the images together in one step.
Select any picture, and the picture format tab appears: On the picture format tab, in the adjust group, click the compress pictures button: In the compress pictures dialog box:
To compress all pictures in the presentation, unselect the apply only to this picture checkbox. Compress pictures in your presentation select a picture in your document. The picture format tab appears.
On the picture format tab, in the adjust group, select compress pictures. Under compression options, do any of the following: Make sure that apply only to this picture is not selected so that.
Open the powerpoint document and select the picture you need to reduce size. Then go to format > compress pictures. Now, a dialogue box pops up and you can choose “apply only to this picture”.
Then you can select the resolution that fits your needs and finally click ok. Click the picture format ribbon at the top of the screen. Click compress pictures (to the right of the transparency icon).
Select the checkbox to delete cropped areas of pictures to reduce the overall size of the image or picture in the presentation. Which statement about the compress pictures command is true? You can compress all images at the same time.
You cannot delete cropped areas. There are no options for print output. You can compress only one image at a time.
You have a word document you would like to import as an outline into a powerpoint presentation. With the picture selected, click the compress pictures button on the format tab. Select your compression options.
Apply only to this picture: The output resolution setting you choose will only be applied to the selected picture. If not checked, it will be applied to all pictures.
Delete cropped areas of pictures: Cropped out areas of pictures. Select the picture you want to compress, then click the format tab.
Click the compress pictures command. A dialog box will appear. Place a check mark next to delete cropped areas of pictures.
You can also choose whether to. Choose a target output. If you are emailing your.